In this step, you will add the required code for each of the Push Button event routines.
When you are finished with this step, you will have entered the three lines of RDML/RDMLX code to implement the action required by each the push button:
* When the user clicks the Clear push button, the contents of the STD_TEXT field is
changed to blanks.
EVTROUTINE HANDLING(#CLEAR.Click)
Change Field(#STD_TEXT) TO(*BLANKS)
ENDROUTINE
* When the user clicks the Hello push button, the word Hello is concatenated to the
contents of the STD_TEXT field.
EVTROUTINE HANDLING(#HELLO.Click)
#STD_TEXT := #STD_TEXT + 'Hello '
ENDROUTINE
* When the user clicks the World push button, the word World is concatenated to the contents of the STD_TEXT field.EVTROUTINE HANDLING(#WORLD.Click)
#STD_TEXT := #STD_TEXT + 'World '
ENDROUTINE
1. Type the CHANGE command for the Clear button Click event:
Change Field(#STD_TEXT) To(*BLANKS)
2. Put the cursor on the CHANGE command in the editor and press the F1 key to display the online help to review specific technical details about using this command.
3. Complete the World.Click event routine by entering the following ASSIGN statement:
#STD_TEXT := #STD_TEXT + 'World '
Your code should always use the ASSIGN command to set values and handle expressions. The CHANGE command is included here for completeness. It has been superceded by the ASSIGN command.
4. Put the cursor anywhere on the STD_TEXT statement in the editor and press the F1 key to display the online help to review specific technical details about using the ASSIGN command:
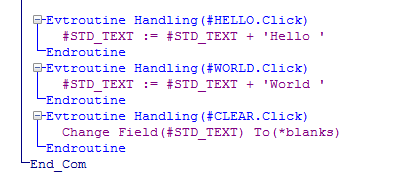
Your finished code should look like this:

Note: *blanks is a System Variable. System Variables are covered in the Repository tutorials.
There should be no red triangles in the source code which indicate an error. If any errors exist, they must be corrected.
Note that in the event-driven program model, the order of the event routines in the code is not important to the execution of the form.
5. Click on the Save toolbar icon to save the form.
