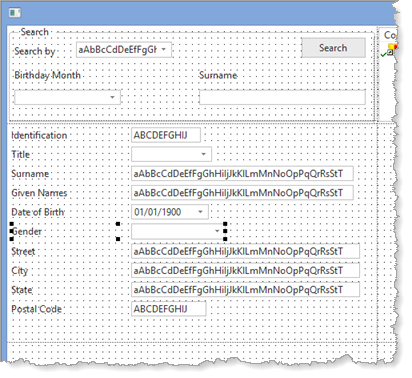
1. Locate the table xEmployee on the Repository tab and expand its definition. Hold down the Shift key and select fields from xEmployeeIdentification to xEmployeeePostalCode and drag them to the top of Row 2, Column 1.
a. While all the fields are selected, give them an Alignment of Top Left and Flow of Down. Change margin Top and margin Left to 5.
b. Reduce the field widths as necessary.
c. If necessary increase the form width so the fields fit within the row.
d. Select field Gender and change MarginLeft to 150.
e. Select field xEmployeeIdentification and change ReadOnly to True.
Your design should look like the following:

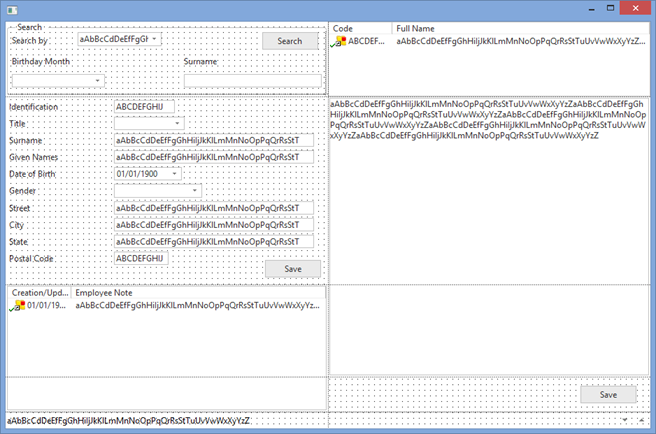
2. Drag a List View into Row 3, Column 1.
a. Give it a Size of Fit Both.
b. On the Layout ribbon, change its Rows Span to 2:

c. Change all margins to 2
d. Change Name to NotesList.
e. Create an ItemGotSelection event routine.
3. Locate the table xEmployeeNotes on the Repository tab and expand its definition.
a. Drag field xEmployeeNoteCreateUpdate into list NotesList.
b. Drag field xEmployeeNote into list NotesList.
c. Change its WidthType to Remainder.
d. Drag field xEmployeeNoteGUID into NotesList
e. Change its Visible to False
4. Drag a Multiline Edit Box (see All Controls tab) onto Row 2, Column 2.
a. Change Name to EmployeeNotes
b. Change WordWrap to True
c. Drag field xEmployeeNote into the multiline edit box.
d. On the Layout ribbon change its Row Span to 2.
e. Set all margins to 2 pixels
5. Drag a push button onto Row 4, Column 2.
a. Change Alignment to Center Right and Flow to Left.
b. Change margin Right to 20.
c. Change Caption to Save
d. Change Name to SaveNoteButton
e. Create a Click event routine
6. Drag a push button at the bottom right of Row 2, Column 1.
a. Change Alignment to Bottom Right and Flow to Up.
b. Change margin Bottom to 10 and margin Right to 10.
c. Change Caption to Save
d. Change Name to SaveEmployeeButton
e. Create a Click event routine.
Your design should look like the following:

7. Save the form.