This step will add a Delete push button and a Delete method routine which executes the Delete srvroutine in the xDepartments Server Module.
A Confirm dialog will be provided using the MessageBox control.
1. Add a third push button to row 2.
a. Select the Layout ribbon, change Alignment to Top Left and Flow to Right
b. Change margin Top and Left to 20
c. On the Details tab, change Caption to Delete
d. Change the Name to DELETE
e. Create a Click event.
2. Switch to the iiixDepartmentsDataServer server module. Review the Delete srvroutine. Note that it receives department code as input and outputs the IO$STS field. The Delete command, deletes with the key xDepartmentCode.
3. In the web page, create a Delete method routine. Add code similar to the Insert and Update method routines. Your code should look like the following:
Evtroutine Handling(#Delete.Click)
#com_self.Delete
Endroutine
. . . .
Mthroutine Name(Delete)
Define_Com Class(#iiixDepartmentsDataServer.delete) Name(#DeleteDepartment)
#DeleteDepartment.ExecuteAsync( #xDepartmentCode #IO$STS )
Evtroutine Handling(#DeleteDepartment.Completed)
If (#IO$STS = OK)
#xDepartments := *default
#xDepartmentCode.Enabled := True
Endif
Endroutine
Endroutine
Note that if the Delete is successful, the Department Code's Enabled property is set to True.
4. Compile and test your web page. Add a new department and then delete it. The fields should be cleared after deletion. Try to Fetch the record to confirm that it was deleted.
5. This step will use a MessageBox control to provide a confirm delete dialog.
On the Controls tab select All Controls and drag and drop a MessageBox control onto the web page.
Note: It will not be displayed on the Design view. It will currently be the selected control.
Select the Details tab and change the Name to MessageBox.
6. Switch to the Source tab and locate the MessageBox definition. This should be below the existing Define_Com statements.
a. Select #MessageBox in the Name and press F2.
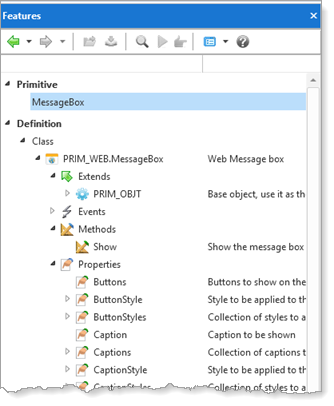
b. The Features tab will be displayed showing the MessageBox component in detail.
c. Expand Events, Methods and Properties.
Note the following:

7. Create a Confirm method. This will set up the MessageBox as a confirm dialog.
Add logic to perform the following:
Set MessageBox Title to Confirm
Set MessageBox Caption to 'Delete department: ' plus the department code
Set MessageBox image to Question
Set MessageBox Buttons to YesNo
Invoke the MessageBox Show method
Your code should look like the following:
Mthroutine Name(Confirm)
#MessageBox.Title := 'Confirm'
#MessageBox.Caption := ('Delete department: ' + #xDepartmentCode)
#MessageBox.Image := Question
#MessageBox.Buttons := YesNo
#MessageBox.Show
Endroutine
8. Change the Delete.Click event to invoke the Confirm method:
Evtroutine Handling(#Delete.Click)
#com_self.confirm
Endroutine
9. Create an event routine handling MessageBox.Closed.
An If condition should check if MessageBox.Result is equal to Yes and then invoke the Delete method routine.
If the messagebox.result is NO, clear the fields and set xDepartmentCode's Enabled property to True.
Evtroutine Handling(#MessageBox.closed)
If (#MessageBox.result = Yes)
#com_self.delete
Else
#xdepartments := *null
#xDepartmentCode.Enabled := true
Endif
Endroutine
10. Compile your web page.
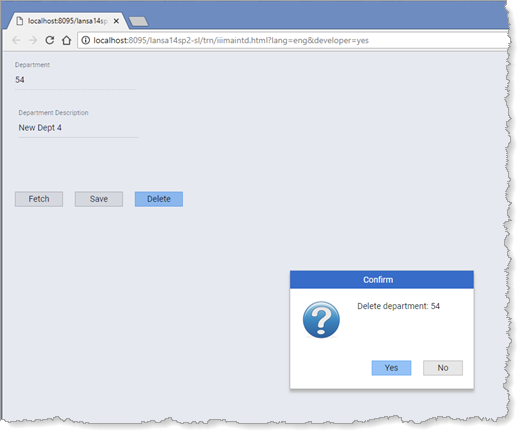
11. Test your web page. Retrieve a department and click the delete button. The confirm message box should be displayed:

Note that the message box is displayed modally. The rest of the web page is disabled until the message box closes when a button is clicked.
12. Click No.
Add a new department, fetch it and then click Yes in the Confirm dialog. Check that the record was deleted.