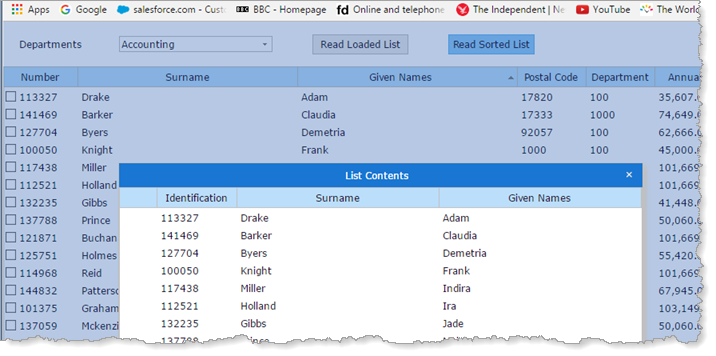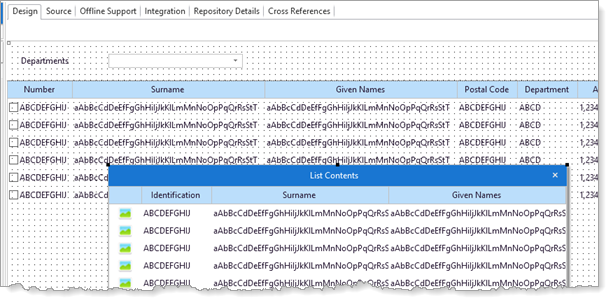
In this step, you will add a Pop-Up component to the web page using the reusable parts described above, to display the employee list entries in loaded or sorted sequence.

1. Copy web page iiiListBasics to create:
Name: iiiListBasics_B
Description: List Component with Sorting
To implement the ListViewer pop up you will extend your web page to:
|
2. Select the Source tab. Below existing Define_Com statements, define an Array Collection, with the name EmployeeColl, collecting xDemoWebPassingworkingListsEmployeeItem:
* Collection of Employee Items that acts as a list
Define_Com Class(#Prim_acol<#xDemoWebPassingWorkingListsEmployeeItem>) Name(#EmployeeColl)
3. On the Repository tab, locate the reusable part (Pop_Up component), xDemoWebPassingWorkingListsListViewer.
Switch to the Design tab, drag the Pop_Up component onto the top row. You will correct its position in a moment.
4. Select the Pop-Up component and using the Home ribbon, use the Bring Forward button option Bring to the Front to bring the Pop_Up to the front of the web page display.
5. On the Details tab, change the Pop-Up component's Name to ListViewer.
6. Drag the ListViewer component centered over the employee list.

7. Drag and drop a push button onto the top row of the web page.
a. Using the Layout ribbon change Alignment to Center Left and a Flow to Right.
b. Change its margin Left to 50.
c. Using the Details tab, change Caption to Read Loaded List.
d. Change Name to Button_Loaded.
e. Change Width to 120.
f. Create a Click event routine.
8. Add a second push button onto the top row:
a. Change Alignment to Center Left and Flow to Right.
b. Change margin Left to 50.
c. Change Caption to Read Sorted List
d. Change Name to Button_Sorted.
e. Change Width to 120.
f. Create a Click event routine.
9. To read the list in loaded order, you must use a Selectlist/endselect loop. Complete the Button_Loaded.Click event routine by adding code to perform the following:
Clear the list EmployeeColl (actually an array collection)
Read all EmployeeList entries using Selectlist
Add each entry to collection EmployeeColl
End of SelectList
Invoke the ListViewer's Show method, passing a reference to the collection EmployeeColl.
Your code should look like the following:
Evtroutine Handling(#Button_Loaded.Click)
Clr_List Named(#EmployeeColl)
Selectlist Named(#EmployeeList)
Add_Entry To_List(#EmployeeColl)
Endselect
#Listviewer.Show(#EmployeeColl)
Endroutine
10. To read the list in sorted order, you must process it in a For/Endfor loop. This logic was used in exercise WBF025. Use F2 on the List control to discover the property EmployeeList.Items, which is a collection of list view item components, that is, each list entry.
Complete the Button_Sorted.Click event routine by adding code to perform the following:
Clear the list EmployeeColl (actually the array collection)
For each "Employee" in the collection EmployeeList.Items
Get entry Employee.Entry from list EmployeeList
Add an entry to collection EmployeeColl
End For
Invoke the ListViewer's Show method passing a reference to the collection EmployeeColl.
Your code should look like the following:
Evtroutine Handling(#Button_Sorted.Click)
Clr_List Named(#EmployeeColl)
For Each(#employee) In(#EmployeeList.items)
Get_Entry Number(#employee.entry) From_List(#EmployeeList)
Add_Entry To_List(#EmployeeColl)
Endfor
#Listviewer.Show(#EmployeeColl)
Endroutine
11. On the Design tab, select the list component EmployeeList.
Select each of the columns Postal Code, Department and Salary and change the SortOnClick property to True. Number, Surname and Given Names were made sortable in the previous exercise.
Change the Salary column to SortDirection = Descending.
12. Compile the web page.
13. Test the web page. Select a department with a number of employees, for example, Accounts.