Step 1. Execute the Solution Template
1. In the Azure Portal, navigate to Marketplace and in the search box type LANSA.
2. Select LANSA Scalable Stack.
3. Choose which plan you want to use. Choosing Custom allows all parameters to be specified. Choosing one of the other plans or Stack Type sets the following parameters:
LANSA Azure Stack Type Settings
|
4. Read and understand the Overview and then click on Create. The Solution Template will be loaded.
5. The parameters for the custom template are separated into 5 blades: Basics; Security; Database; Application Gateway and Installation Options. The parameters for the other templates are separated into 3 blades: Basics; Security; Database – the parameters for the other 2 blades are present as per the above table
If you hover over the 'i', just to the right of the parameter name, there is a description of the parameter.
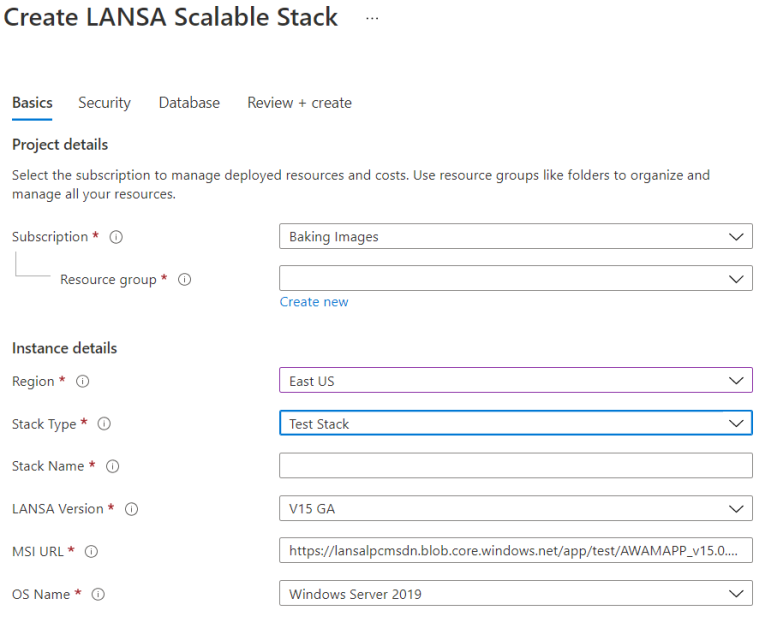
6. Basics Blade for Custom Template.
-
Firstly, the Resource Group collects all the resources which are created. So, choose to create a new Resource Group so that the only resources in this Resource Group are for this LANSA Stack.
-
The Stack Name will be part of the URL of your application.
-
The Stack Name may be limited to 9 characters as some resource names will truncate the name if it's longer than 9. And you may not care about that and would rather use a meaningful name in your URL which is longer than 9 characters.
-
The Resource Group name and the Stack Name should be at least related, if not identical. This helps you to locate the Resource Group when you are given the name of any of the resources in the Resource Group.
-
Choose the LANSA Version that matches the version of LANSA which you used to create the MSI.
-
The MSI URL is the URL of your MSI which you have saved from an earlier step. Paste it into here. Or you may choose to use the default MSI as a test of the LANSA Scalable Stack.
-
Choose the Operating System version which you wish to run the application on.
-
There are two virtual machine sizes provided. This will be changed in a future release of the template because both virtual machines run your application now. They are both incorporated into the load balancer that runs your application. The App Virtual Machine Size in the virtual machine is the main machine type that will be running your application. This is the VMSS which scales out. The DB Admin Virtual Machine Size is for a virtual machine used to provision and update the database schema in the application's database. If you click on Change size you may select from any virtual machine size that is available in the current Region. Note that the displayed cost of the virtual machine incorporates both, the infrastructure cost and the LANSA license cost for one machine, even if you have set Minimum Instance Count to a value greater than 1.
-
It is better to keep the size of the virtual machines relatively small so that you keep the incremental cost of adding another instance to a minimum. For example, a small instance may cost $0.11/hr. To add 1 more instance to manage the current load will cost a further $0.11/hr. Compare that with an instance which costs $1.872/hr. To add another instance will cost that again, even though you may only need to add one tenth of that resource to support the current load. This is a change of mindset. In the Cloud, if a machine is not running properly, you'll just delete it. Auto scaling will then create another for you to replace the deleted instance. As you get used to software-defined infrastructure you'll get to trust that the scale set has deployed your application and brought it online faultlessly thousands of times. So just let it do its job.
-
The Minimum Instance Count sets the minimum number of virtual machines which will be running, even if there is no load on the system. Generally, it is best to leave this set to 1 and let the Scale Set determine the number of machines required.
-
The Maximum Instance Count limits the maximum number of virtual machines that will be started by the Scale Set. The Max Instance Count limit of 600 instances is an Azure limitation. If that is insufficient for your needs, then you will need to increase the power of the Virtual Machine size you are using, thus requiring fewer instances.
-
Web Server Max Connect limits the maximum number of LANSA jobs that will be run on each virtual machine at any one time. This needs to be tuned to your application's needs so that when the maximum number of jobs are running, the load exceeds the Scale Sets trigger point, but no larger. It will be necessary to gather performance statistics to set this value appropriately. For the first time just leave it at the default value. As the size of the instance increases so the maximum number of web jobs that may be run increases. Note that the SQL database may be a limiting factor on performance, so in order to just be load testing the web server, use a much higher performance SQL database than the one that will be used in production so that its performance is eliminated from these load tests. Once it's clear what Web Server Max Connect needs to be set to, then you may load test to determine the SQL database size.
7. Security Blade.
-
The Certificate Base64Encoded parameter requires the web site's SSL certificate to be converted to a base64 string and the result entered here. To get the certificate data from a pfx file in PowerShell you can use this: [System.Convert]::ToBase64String([System.IO.File]::ReadAllBytes("path to pfx file"))
-
The SSL certificate should be password protected. Enter this password in the Certificate Password parameter.
-
Admin Username/Password and Web Username/Password are users created in the virtual machines. Admin is for administration of the virtual machine. Web is the user under which the LANSA jobs are run. Choose whatever values you wish. The passwords have complexity requirements which are displayed if you enter an invalid password. The rules are currently "Password length should be 12-255 characters long, and have at least one number, one lower case, one upper case and one special character"
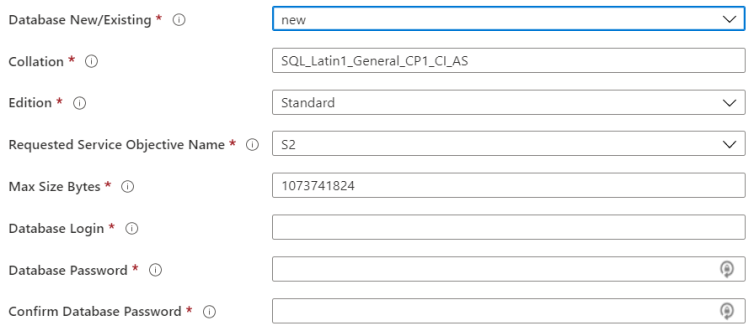
8. Database Blade New
-
When you need the template to create a new database as part of the deployment, choose New as the first parameter.
-
Collation possible values are discussed here: Azure SQL Database Collations .
-
Requested Service Objective Name values are discussed here: DTU Purchasing Model.
-
Database Login is the database administrative user that you want created.
-
Database Password is the password you want to use for your Database Login.
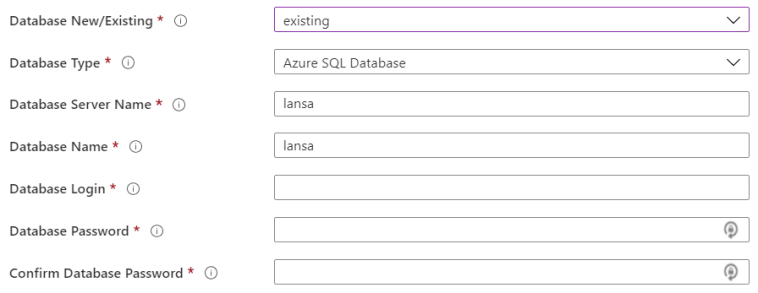
9. Database Blade Existing.
-
When you need the template to use an existing database as part of the deployment, choose Existing as the first parameter.
-
Specify the Database Type the application needs to use.
-
Specify the Database Server Name:
-
For an Azure SQL Database it is the fully qualified domain name and is the "Server name" property in the Azure Portal.
-
For a SQL virtual machine, it is the public IP address of the virtual machine.
-
For an Azure Database for MySQL server, it is the ??????????????
-
-
Specify the Database Name.
-
For an Azure SQL Database, it is the actual resource name in the Azure Portal.
-
For a SQL virtual machine, it is the database name that may be displayed in Microsoft SQL Server Management Studio. If this database does not exist, it will be created.
-
For an Azure Database for MySQL server, it is the name of the database you have created from the command line.
-
-
Database Login is the database administrative user of the existing database.
-
Database Password is the password of the existing database.
10. Application Gateway Blade.
-
The Application Gateway SKU Name possible values are described here: Application Gateway Sku Name.
-
The Application Gateway Capacity refers to the number of Application Gateway instances that are available. It is advisable to have at least 2 so there is redundancy.
-
The remainder of the parameters should be left set to their default values, even Install MSI should be left at 0. The default behavior is to install the MSI and update the web configuration. Step 2. Updating the LANSA Stack describes the remaining parameters in more detail.
11. Click Create.
12. The template will now provision the Complete LANSA Stack. No more steps need to be completed.
13. Once the deployment has succeeded, it may take a further 5 or 10 minutes for the application to be fully installed. Until it is completed, an attempt to use the Web Server will timeout.
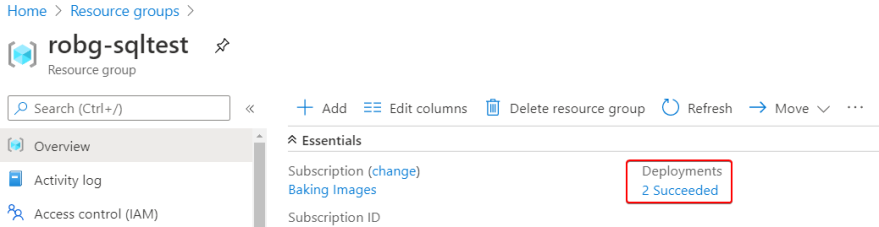
14. One of the outputs of the template is the URL of the Load Balancer. Use this to execute your application. This is how you can locate the outputs of the template:
Firstly, locate the resource group that you deployed into, and click on the blue writing below Deployments as shown in this screen grab. It usually says "2 succeeded".
Then click on the name "lansa.lansa-scalable-stack-…" in the list of deployments.
![]()
And then on the "Outputs":

The lbFqdn value is the load balancer fully qualified domain name.
Other notable values are the dbrdpAddress and rdpAddress which you use to RDP into the virtual machines. Note that port 3389 is not used.