2.5 Security Setting
This dialog box opens when you press the Security.. button on the Listener Information dialog. (To reach the Listener Information dialog, you select Listener from the main window's Advanced menu.) The server side of LANSA Communication Extensions will determine whether the communication line is to be a secure or a non-secure line.
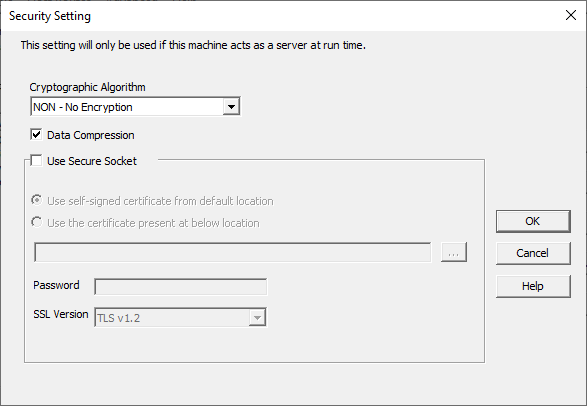
Cryptographic Algorithm
Select the cryptographic algorithm you require from the drop down list.
Options are:
- None - No encryption applied. This applies to releases prior to LANSA Communication Extensions V10.0.
- DES - Data Encryption Standard. This standard was adopted by ANSI in 1981. DES is a block cipher, it encrypts data in 64 bit blocks. The key length is 64 bits.
- TWOFISH - Twofish is a 128 bit block cipher. The key length can be 128, 192 or 256 bits, however, due to US restrictions, LANSA only uses a key length of 128 bits.
Twofish is one of the five finalists for the Advanced Encryption Standard(AES). This standard was introduced by NIST(National Institute of Standards and Technology).
- SSL – Secure Socket Layer. SSL and its successor TLS v1 are today the most widely used protocols providing end-to-end encryption of network communications.This is the recommended option for best data encryption protection. The current implementation is based on OpenSSL on all platforms. See http://www.openssl.org for more information about OpenSSL. Our use of OpenSSL does not require certificates for server authentication.
Compression
Select this option to enable and disable compression during connection.
The use of encryption and/or compression algorithms cause more CPU cycles to be consumed during communication sessions.
This option is not used when SSL is used. SSL has data compression integrated into the protocol.
Secure Sockets
Select this option to use the SSL/TLS protocols to authenticate and encrypt your data transmission between your client and server. SSL/TLS is designed to facilitate privacy and data security for communications over a network.
Options
Use self-signed certificate from default location
Select this option to use the default self-signed certificate that is installed by the Visual LANSA install.
Use the certificate present at below location
Select this option to use a certificate that you have obtained/generated. If you select this option, then specify the location of the certificate (in pfx or p12 format) in the field below. Use the “…” button to browse for the file.
Password
When generating a self-signed certificate or obtaining a Certificate Authority (CA) issued certificate in .pfx or .p12 format, the private key, certificate bundle/chain and the certificate in .crt format may be wrapped or bundled using a password. The password may be blank. The password is required to parse the .pfx or .p12 package when communication is being established. The password must match exactly the password given during .pfx/.p12 generation otherwise the communication attempt will fail.
SSL Version
Select the TLS version to use. Only the version that is currently supported by the operating system is listed. At the time of writing TLS 1.3 is only supported on Windows 11 and Windows Server 2022 and higher. Ensure that all clients that will be connecting to the server are able to support the selected version.
Notes
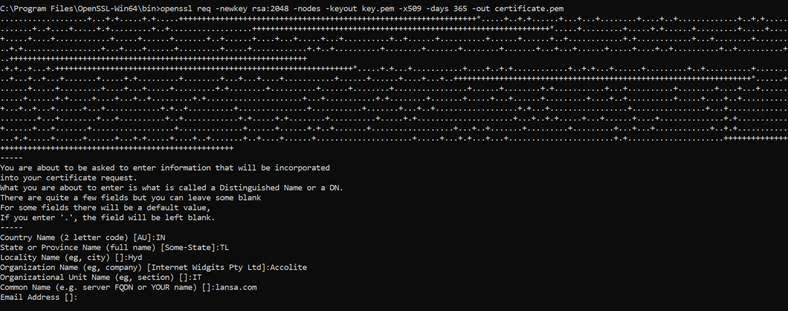
How to generate a self-signed certificate
The following commands is used to generate a self-signed certificate:
openssl req -newkey rsa:2048 -nodes -keyout <keyFileName.pem> -x509 -days <xxx> -out <certificateFileName.pem>
keyFileName.pem: Specifies the name of the file where the private key will be saved.
xxx: The number of days that certificate is valid for. You can adjust this value as needed. For example, specify 365 to have the certificate for 1 year.
certificateFileName.pem: Specifies the name of the file where the generated X.509 certificate will be saved.
OpenSSL will generate a new RSA private key, create a self-signed X.509 certificate using that key, and save both the key and certificate in the respective files (<keyFileName.pem> and <certificateFileName.pem>)
openssl pkcs12 -inkey <keyFileName.pem> -in <certificateFileName.pem> -export -out <certificate.p12>
keyFileName.pem: Specifies the input file containing the private key.
certificateFileName.pem: Specifies the input file containing the certificate.
-export: This option tells OpenSSL to export the private key and certificate into a PKCS#12 file.
certificate.p12: Specifies the name of the output PKCS#12 file.

How to use a custom certificate from both a self-signed and CA issued perspective
A certificate in a .pfx/.p12 format is a common way to store a digital certificate and its associated private key in a single file.
Different certificate formats:
|
PEM (.pem)
|
This is a widely used format that stores the certificate and private key separately in plain text files.
|
|
DER (.der)
|
A binary format used for certificates.
|
|
PKCS#7 (.p7b)
|
A format that can store multiple certificates, often used for certificate chains.
|
|
PKCS#12 (.pfx/.p12)
|
This format stores both the certificate and private key in a single file, typically password-protected.
|
|
Certificate (.crt)
|
A .crt file, short for "certificate," typically contains the public key and additional information about the entity (e.g., a server or an individual) to whom the certificate is issued. It may also include the digital signature of a trusted Certificate Authority (CA), which vouches for the authenticity of the public key and the entity's identity.
|
|
Private key (.key)
|
A .key file, short for "private key," contains the secret key associated with the public key in the corresponding .crt file.
|
|
Create a .pfx/.p12 file from multiple certificate files and private key file
If you receive multiple .crt files and .key file from the CA authority, you should bundle those into a single file (.pfx/.p12) file. Use the following commands to bundle all files into a single file.
type "certificate1.crt" "certificate2.crt" > certificate.pem
Bundles the .crt files into a single .pem file.
openssl.exe pkcs12 -in “certificate.pem” -inkey "private.key" -export -out caCert.pfx
Combines the .pem and .key file into a .pfx file.
The generated .pfx/.p12 file can then be used.
Export the .pfx/p12 certificate from certificate manager
Right-click on the certificate you want to export.
Select "All Tasks" > "Export..."
The Certificate Export Wizard will open. Click "Next" to start.
Select "Yes, export the private key" if the private key is exportable.
Choose the format you want to export the certificate as, which in this case is "Personal Information Exchange - PKCS #12 (.PFX)".
Set a Password:
- Create and confirm a password for the exported .pfx file. This password will be used to protect the private key in the .pfx file. Make sure to remember or securely store this password.
Specify File Name and Location:
- Choose a name and location for the exported .pfx file. Make sure to use the .pfx or .p12 file extension (e.g., certificate.pfx).
Complete the Export:
- Click "Next" and then "Finish" to complete the export process.

