RAMP is shipped with a default set of styles and a jQueryTheme to make the screen appearance resemble a default VLF-ONE screen.
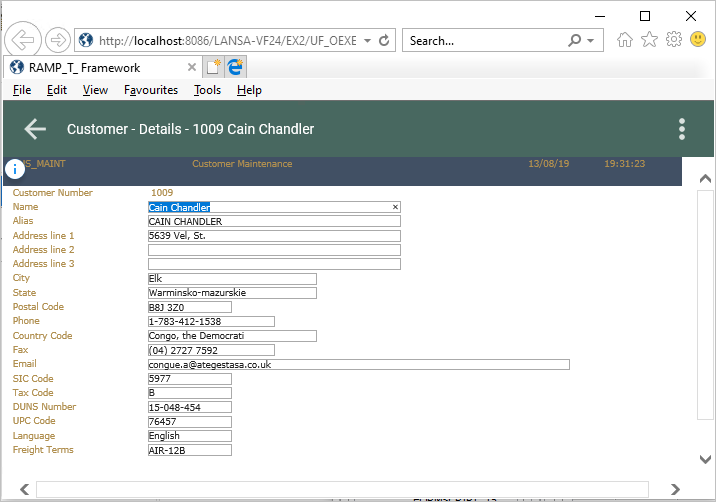
Here is the Customer Maintenance screen without the VLF-ONE styles:
For a new aXes project to adopt the VLF-ONE styles, tick the VLF-ONE RAMP Project check box and the styles will be automatically copied to the project folder. See the tutorial Step 2. Create the Project Container for the RAMP Tutorial .
To manually apply the VLF-ONE styles to an existing project, execute these commands in an IBM i command line:
CPY OBJ('<root>/ts/screens/.defaults/application_definition_vlfone.js') TOOBJ('<root>/ts/screens/<project folder>/application_definition.js') REPLACE(*YES)
CPY OBJ('<root>/ts/screens/.defaults/application_definition_vlfone.css') TOOBJ('<root>/ts/screens/<project folder>/application_definition.css') REPLACE(*YES)
CPY OBJ('<root>/ts/screens/.defaults/axautoguirules_VLFONE.json') TOOBJ('<root>/ts/screens/<project folder>/axautoguirules.json') REPLACE(*YES)
CPY OBJ('<root>/ts/ts2/css/projectThemes/jqtheme_VLFONE/') TODIR('<root>/ts/screens/<project folder>/projectThemes/') SUBTREE(*ALL) REPLACE(*YES)
CHGAUT OBJ('/axes/ts/screens/<project folder name>') USER(*PUBLIC) DTAAUT(*R) OBJAUT(*NONE) SUBTREE(*ALL)
Where:
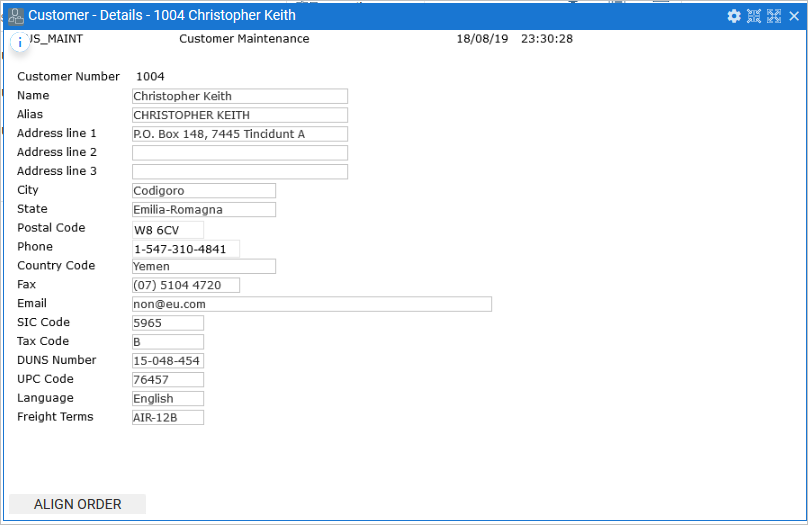
Here the VLF-ONE styles have been applied to the screen:
| RAMP-TS Guide |
|
| How to Get Started with RAMP |
|
| What is RAMP? |
|
| RAMP Stage 1 |
|
| RAMP Stage 2 |
|
| RAMP Stage 3 |
|
| A Modernized Application |
|
| Key Benefits of RAMP |
|
| How the 5250 Application Will Change |
|
| 5250 Application Before Modernization |
|
| 5250 Application After Using RAMP |
|
| Accessing Data in the Modernized Application |
|
| Navigation in the Modernized Application |
|
| Modernization Process Overview |
|
| Stage 1: Creating a Modernization Framework |
|
| Who Should Be Involved? |
|
| Creating the Prototype |
|
| Executing and Refining the Prototype |
|
| Stage 2: Incrementally Modernizing the 5250 Application |
|
| Naming the 5250 Screens |
|
| Tracking and Classifying the Screens |
|
| RAMP Stage 2A: Rapidly Modernizing Complete Application Segments |
|
| RAMP Stage 2B: Individually Modernizing Frequently Used Screens |
|
| RAMP Stage 2C: Adding Value |
|
| What Adds Value? |
|
| How to Do It? |
|
| Stage 3: Removing IBM i Platform Dependencies |
|
| Prerequisite Skills |
|
| Warnings and Disclaimers |
|
| What's New |
|
| New Features in EPC 142057 Version of RAMP |
|
| New Features in EPC 142011 Version of RAMP |
|
| New Features in EPC 142005 Version of RAMP |
|
| New Features in EPC 141081 Version of RAMP |
|
| New Features in EPC 141017 Version of RAMP |
|
| RAMP Button properties |
|
| New Features in EPC 141006 Version of RAMP |
|
| New Features in EPC 132100 Version of RAMP |
|
| New Features in EPC 868 Version of RAMP |
|
| New Features in EPC 843 Version of RAMP |
|
| Licensing Requirements |
|
| Installation and Configuration |
|
| Installation on the Server |
|
| Install and Configure RAMP-TS / aXes-TS on your IBM i Server |
|
| Verify your RAMP-TS/aXes-TS Installation |
|
| Backup Strategy |
|
| Configuration |
|
| Verify Browser Security Settings |
|
| Set Up Reverse Proxy for the Browser |
|
| Configure RAMP |
|
| Enable RAMP in the Framework |
|
| Set up SuperServer Session |
|
| Specify RAMP-TS Server Details |
|
| Setting up the Shipped VLF-ONE RAMP Demo |
|
| To Use RAMP You Need to Have aXes Installed and Running on Your IBM i |
|
| Locate and Unzip the aXes Project vf_vlfone_ramp_demo |
|
| Find Out Your aXes Version |
|
| In aXes 4.1.1 |
|
| In aXes 4.2 |
|
| Configure the Shipped VLF-ONE Demonstration System for Your Servers |
|
| Verify RAMP Tools Functions as Expected |
|
| Set up a Valid 5250 RAMP Demonstration User Profile |
|
| Execute the Shipped RAMP Demonstration System |
|
| Remember It Is Not a Real 5250 Application |
|
| When Many Developers Work on the Same Application |
|
| Handle Multiple Framework Versions |
|
| Script Naming Convention |
|
| Starting RAMP |
|
| Start LANSA |
|
| Start the Framework |
|
| Start RAMP |
|
| Start the Instant Prototyping Assistant |
|
| Concepts |
|
| Steps Involved in Using RAMP |
|
| RAMP Window |
|
| Message Area |
|
| Screen Tracking Area |
|
| RAMP-TS 5250 Emulator Session |
|
| Screen and Script List |
|
| Organizing Screens and Scripts |
|
| Details Area |
|
| Session Details |
|
| Destination Screen Details |
|
| Script Area |
|
| Screen Name Finder |
|
| Types of Screens |
|
| Destination Screen |
|
| Junction Screen |
|
| Special Screen |
|
| Naming Conventions |
|
| OBJECT-ACTION User Interfaces |
|
| Modernization Issues |
|
| The most important and complex 5250 program in an application can become a modernization trap |
|
| How long will it take to RAMP my application? |
|
| Reuse, Reface or Rewrite? |
|
| 5250 Application Session Guidelines |
|
| General Issues |
|
| VLF-ONE Specific Issues |
|
| Issues with Porting VLF-WIN/WEB Application Sessions |
|
| Issues with Multiple Smaller and Simple Sessions |
|
| Tutorials for RAMP VLF-ONE |
|
| Essential RAMP Concepts (VIDEO) |
|
| Before You Start |
|
| Check Software Prerequisites |
|
| IBM i User Profile and Library List Considerations |
|
| Create an aXes Project |
|
| Step 1. Start a Developer Session in aXes |
|
| Step 2. Create the Project Container for the RAMP Tutorial |
|
| Create the VLF tutorial application |
|
| Step 1. Launch the VLF Developer's Workbench |
|
| Step 2. Create an Empty Framework |
|
| Step 3. Create the RAMP Tutorials Application |
|
| Define the IBM i and RAMP Server |
|
| RAMP-ONE01: Concepts Review |
|
| RAMP-ONE02: Identify and Classify |
|
| Step 1. Start RAMP Tools |
|
| Step 2. Start a 5250 Session with the Host |
|
| Step 3. Identify |
|
| Screens with Identical Signatures |
|
| How to Add an Additional Identifier |
|
| Identify the Screens |
|
| Identify Special Screens |
|
| Things to Remember |
|
| Step 4. Classify |
|
| Step 5. Introduction to Scripts |
|
| RAMP-ONE03: Navigate to Work with Active Jobs |
|
| Step 1. Introduction |
|
| Step 2. Enable Choreographing |
|
| Step 3. Choreograph MainLogin to MAIN |
|
| Step 4. Choreograph MAIN to WRKACTJOB |
|
| Step 5. Choreograph WRKACTJOB to MainLogin |
|
| Step 6. Disable Choreographing |
|
| Step 7. Review Scripts |
|
| Step 8. Link Destination WRKACTJOB with Command Active Jobs |
|
| Step 9. Execute the VLF-ONE Application |
|
| RAMP-ONE04: Navigate to Work with System Status |
|
| Step 1. Start RAMP Tools |
|
| Step 2. Sign In |
|
| Step 3. Classify Work with System Status |
|
| Step 4. Get Ready to Choreograph |
|
| Step 5. Enable Choreographing |
|
| Step 6. Choreograph MAIN to WRKSYSSTS |
|
| Step 7. Choreograph WRKSYSSTS to MAIN |
|
| Step 8. Disable Choreographing |
|
| Step 9. Link Destination WRKSYSSTS with Command System Status |
|
| Step 10. Execute the VLF-ONE Application |
|
| RAMP-ONE05: Adding Value with Filters – Product Maintenance |
|
| Step 1. Review Shipped Product Maintenance in Green Screen |
|
| Step 2. Filters |
|
| Step 3. Commands |
|
| Step 4. Identify and Classify Product Screens |
|
| Step 5. Choreograph from MainLogin to PRO_MAINT |
|
| Step 6. Edit the PRO_KEY Script |
|
| Step 7. Link PRO_MAINT Destination with Details Command |
|
| Step 8. Execute |
|
| RAMP-ONE06: Enhance Product Details |
|
| Step 1. Start RAMP Tools |
|
| Step 2. Edit the screen |
|
| Step 3. Reposition fields |
|
| Step 4. Add group boxes |
|
| Step 5. Visualize Discontinued as a checkbox |
|
| Step 6. Visualize Class as a dropdown |
|
| Step 7. Rearrange the fields |
|
| Step 8. Only Enable the Enter Button |
|
| Step 9. Save and Unlock the Screen |
|
| Step 10. Execute |
|
| RAMP-ONE07: Choreograph Navigation to Customer Details |
|
| Step 1. Enable the Details Command Handler for Customers |
|
| Step 2. Identify and Classify Customer Screens |
|
| Step 3. Get Ready to Choreograph |
|
| Step 4. Choreograph Navigating from MAIN to CUS_MAINT |
|
| Step 5. Edit the CUS_KEY Script |
|
| Step 6. Link CUS_MAINT with the Customer Details Command |
|
| Step 7. Execute |
|
| Advanced VLF-ONE RAMP Tutorials |
|
| Before You Start |
|
| RAMP-ONEAD01: Screen Sizing |
|
| How Is the Layout Applied? |
|
| RAMP-ONEAD02: Manage Function Keys and Buttons |
|
| Step 1. Enable Only the Enter Key |
|
| Step 2. Enable Only the Enter Button |
|
| Step 3. Modify the Caption of the Enter Button |
|
| Step 4. Execute the Application |
|
| RAMP-ONEAD03: Add Value with Prompters: States Drop Down |
|
| Step 1. Name the Fields |
|
| Step 2. Execute the Application |
|
| RAMP-ONEAD04: Add Value with Prompters: List and Search |
|
| Step 1. Name the Fields |
|
| Step 2. Execute the Application |
|
| RAMP-ONEAD05: Add Value with Cross Scripting |
|
| Step 1. Choreograph Orders |
|
| Step 2. Modify ORD_MAINT Script |
|
| Step 3. Modify CUS_MAINT Script: Listen to the Event and React |
|
| Step 4. Execute the Application |
|
| Tutorials for RAMP VLF-WIN |
|
| Before You Start |
|
| IBM i User Profile and Library List Considerations |
|
| Create an aXes Project |
|
| Step 1. Start a Developer Session in aXes |
|
| Step 2. Create the Project Container for the RAMP Tutorial |
|
| Create the VLF tutorial application |
|
| Define the IBM i and RAMP Server |
|
| RAMP-WIN001: Creating a Basic Prototype of the Modernized Application |
|
| Application before Modernization |
|
| RAMP-WIN001 Step 1. Create the Application Prototype |
|
| RAMP-WIN001 Step 2: Modify the Code Tables Prototype |
|
| RAMP-WIN001 Step 3: Examine the Employees Prototype |
|
| RAMP-WIN001 Step 4: Prototype End-User's Access to Employee Information |
|
| RAMP-WIN001 Step 5. Visualize the Filters |
|
| RAMP-WIN001 Step 6. Validate the Basic Prototype |
|
| Summary |
|
| RAMP-WIN002: Rapidly Modernizing Complete Application Segments |
|
| Before You Start |
|
| RAMP-WIN002 Step 1: Enable RAMP |
|
| RAMP-WIN002 Step 2: Name the Screens |
|
| RAMP-WIN002 Step 3: Classify the Screens and Track Navigation |
|
| RAMP-WIN002 Step 4: Remove Cancel and Exit buttons |
|
| RAMP-WIN002 Step 5: Snap the Application into the Framework |
|
| Summary |
|
| RAMP-WIN003: Creating a Data Filter for Employees |
|
| RAMP-WIN003 Step 1. Creating Your Real By Name Filter |
|
| RAMP-WIN003 Step 2. Snapping In the By Name Filter |
|
| RAMP-WIN003 Step 3. Filter Code |
|
| Summary |
|
| RAMP-WIN004: Naming and Classifying the Employee Screens |
|
| RAMP-WIN004 Step 1. Name the Screens |
|
| RAMP-WIN004 Step 2. Classify Screens |
|
| RAMP-WIN004 Step 3. Track Navigation |
|
| RAMP-WIN004 Step 4. Take Snapshots of Your Destination Screens |
|
| Summary |
|
| RAMP-WIN005: Reviewing Design |
|
| RAMP-WIN005 Step 1. Place Snapshots on Mock Up Command Handlers |
|
| RAMP-WIN005 Step 2. Review the Prototype |
|
| Summary |
|
| RAMP-WIN006: Snapping in a Basic Inquiry Screen |
|
| RAMP-WIN006 Step 1. Snap a Basic Inquiry Screen into the Framework |
|
| RAMP-WIN006 Step 2. Change the Script to Use the Current Instance List Entry |
|
| RAMP-WIN006 Step 3. Disable Function Keys |
|
| Summary |
|
| RAMP-WIN007: Snapping in a Data Entry Function |
|
| RAMP-WIN007 Step 1. Snap a Basic Data Entry Screen into the Framework |
|
| RAMP-WIN007 Step 2. Change the Script to Signal the New Employee Number |
|
| RAMP-WIN007 Step 3. Add Error Handling |
|
| RAMP-WIN007 Step 4. Change the Script to Update the Instance List |
|
| RAMP-WIN007 Step 5. Disable Function Keys |
|
| Summary |
|
| RAMP-WIN008: Changing Inquiry Screen to Update Mode |
|
| RAMP-WIN008 Step 1. Create Two Variants of Display Employee Screen |
|
| RAMP-WIN008 Step 2. Script for Update Mode |
|
| RAMP-WIN008 Step 3. Redisplay DisplayEmployee After Save |
|
| RAMP-WIN008 Step 4. Change Button Caption |
|
| Summary |
|
| RAMP-WIN009: Tracing Navigation |
|
| RAMP-WIN009 Step 1. Starting the Trace and Redisplaying the Destination Screen |
|
| RAMP-WIN009 Step 2. Examining the Trace |
|
| Summary |
|
| RAMP-WIN010: Using Special Field Handlers |
|
| RAMP-WIN010 Step 1. Naming the Field |
|
| RAMP-WIN010 Step 2. Associating the Field with the Handler |
|
| RAMP-WIN010 Step 3. Test the Special Field Handler |
|
| Summary |
|
| RAMP-WIN011: Snapping in Shipped Documents Command Handler |
|
| RAMP-WIN011 Step 1. Snapping in the DX_DOCS Command Handler |
|
| RAMP-WIN011 Step 2. Adding Documents |
|
| RAMP-WIN011 Step 3. Working with Documents |
|
| Summary |
|
| RAMP-WIN012: Snapping in Shipped Notes Command Handler |
|
| RAMP-WIN012 Step 1. Snapping in the DF_T3201 Command Handler |
|
| RAMP-WIN012 Step 2. Adding Notes |
|
| Summary |
|
| RAMP-WIN013: Sending Instance List Data to Excel |
|
| RAMP-WIN013 Step 1. Creating the Command Handler |
|
| RAMP-WIN013 Step 2. Snapping in and Testing the Command Handler |
|
| Summary |
|
| RAMP-WIN014: Understanding and Handling Screen Variations |
|
| What is a 5250 Screen? |
|
| RAMP-WIN014 Step 1. Assigning the Same Name to Two Screen Variations |
|
| RAMP-WIN014 Step 2. Handling Different Screens with the Same Signature |
|
| RAMP-WIN014 Step 3. Creating Screen Variants |
|
| RAMP-WIN014 Step 4. Using Screen Variants in the Script |
|
| RAMP-WIN014 Step 5. Creating a Set of Screens (Advanced) |
|
| Summary |
|
| Advanced RAMP Windows Tutorials |
|
| RAMP-WINAD01: Using Buttons to Add Value to an Application |
|
| About Buttons |
|
| RAMP-WINAD01 Step 1. Enable a Framework Button |
|
| RAMP-WINAD01 Step 2. Name Fields to Be Copied on the DisplayEmployee Screen |
|
| RAMP-WINAD01 Step 3. Add a Function to the Script for the DisplayEmployee Screen |
|
| RAMP-WINAD01 Step 4. Call the Function in the ButtonClick Function |
|
| RAMP-WINAD01 Step 5. Test the Buttons |
|
| Summary |
|
| RAMP-WINAD02: RAMP-TS Event Handling Basics |
|
| RAMP-WINAD02 Step 1. Add a Signal Button to the By Name Filter |
|
| RAMP-WINAD02 Step 2. Make Your 5250 Screen Listen to the Signal |
|
| RAMP-WINAD02 Step 3. Test Signaling from Filter to RAMP Screen |
|
| RAMP-WINAD02 Step 4. Add a Signal Button to the RAMP Screen |
|
| RAMP-WINAD02 Step 5. Make the Filter Listen to the Signal |
|
| RAMP-WINAD02 Step 6. Signalling from a RAMP script to a VLF component |
|
| Summary |
|
| RAMP-WINAD03: Special Field Handling |
|
| RAMP-WINAD03 Step 1. Understand What Makes the Prompter Appear |
|
| RAMP-WINAD03 Step 2. Being smarter with HANDLE_PROMPT() |
|
| RAMP-WINAD03 Step 3. Handler Styles |
|
| RAMP-WINAD03 Step 4. Generic Handler Association |
|
| RAMP-WINAD03 Step 5. Generically Associating Date Fields with Date Picker |
|
| RAMP-WINAD03 Step 6. Dynamic Handler Association |
|
| RAMP-WINAD03 Step 7. Communicating with a Handler |
|
| RAMP-WINAD03 Step 8. What to Do When Things Do Not Work |
|
| Summary |
|
| RAMP-WINAD04: Redesigning the Screen Using aXes |
|
| RAMP-WINAD04 Step 1. Get Started with aXes Designer |
|
| RAMP-WINAD04 Step 2. Set up Styles |
|
| RAMP-WINAD04 Step 3. Hide Repetitive Information |
|
| RAMP-WINAD04 Step 4. Add a Tooltip |
|
| RAMP-WINAD04 Step 5. Add a Drop-Down |
|
| RAMP-WINAD04 Step 6. Organize Fields inside Group Boxes |
|
| RAMP-WINAD04 Step 7. Hide Function Keys and Add a Picture |
|
| RAMP-WINAD04 Step 8. Add a Hyperlink |
|
| RAMP-WINAD04 Step 9. Test the Redesigned Screen |
|
| RAMP-WINAD04 Step 10. Remove the Screen Customization |
|
| Summary |
|
| RAMP-WINAD05: Using SHARED Properties and Functions |
|
| What are Shared Scripts? |
|
| RAMP-WINAD05 Step 1. Optional - Creating Your Own Copy of the Shared Scripts File |
|
| RAMP-WINAD05 Step 2. Accessing SHARED properties and functions |
|
| RAMP-WINAD05 Step 3. Creating your own SHARED properties |
|
| RAMP-WINAD05 Step 4. Creating your own SHARED functions |
|
| Summary |
|
| RAMP-WINAD06: Handling Multiple Screens on Multiple Tabs |
|
| RAMP-WINAD06 Step 1. A Multiple 5250 Screen Scenario |
|
| RAMP-WINAD06 Step 2. Name the Screens |
|
| RAMP-WINAD06 Step 3. Classify the Screens |
|
| RAMP-WINAD06 Step 4. Review and Understand the Targets List |
|
| RAMP-WINAD06 Step 5. Using Multiple Command Handler Tabs |
|
| RAMP-WINAD06 Step 6. Review and Alter Buttons and Function Keys |
|
| RAMP-WINAD06 Step 7. Review the value you have added to the 5250 application |
|
| RAMP-WINAD06 Appendix: Function UFRTS03 |
|
| RAMP-WINAD07: Handling Multiple Screens on a Single Tab |
|
| RAMP-WINAD07 Step 1. A Multiple 5250 Screen Scenario |
|
| RAMP-WINAD07 Step 2. Making a Plan |
|
| RAMP-WINAD07 Step 3. Putting the Screens on a Single Tab |
|
| RAMP-WINAD07 Step 4. Enable Function Keys/Buttons and Add Required Scripting |
|
| RAMP-WINAD07 Step 5. Defining the Exit Junctions and vHandle_NAVIGATETO scripting |
|
| RAMP-WINAD07 Step 6. Testing and Debugging |
|
| RAMP-WINAD07 Step 7. Fine Tuning |
|
| RAMP-WINAD08: Screen Wrapper Basics |
|
| RAMP-WINAD08 Step 1. Name the Fields to Be Used in the Wrapper |
|
| RAMP-WINAD08 Step 2. Create and Snap in the Screen Wrapper |
|
| RAMP-WINAD08 Step 3. Understanding the Screen Wrapper Code |
|
| RAMP-WINAD08 Step 4. Test Updating the Screen from the Wrapper |
|
| Summary |
|
| RAMP-WINAD09: Screen Wrapper with a Subfile |
|
| RAMP-WINAD09 Step 1. Add an Image to the Screen Wrapper |
|
| RAMP-WINAD09 Step 2. Add Skills List View to the Wrapper |
|
| RAMP-WINAD09 Step 3. Add Code to Populate the List View |
|
| Summary |
|
| Scripting |
|
| Learning |
|
| Anatomy of Scripts |
|
| Special Screen Script |
|
| Junction Screen Script |
|
| Destination Screen Script |
|
| vHandle_NAVIGATETO Function |
|
| vHandle_ARRIVE Function |
|
| Your RAMP-TS Screen Script Defines a JavaScript Object |
|
| Scripts in a Classic Details Display |
|
| Javascript Essentials |
|
| External JavaScript Documentation |
|
| Basic Javascript syntax |
|
| Reading, Writing and Storing Values |
|
| alert() |
|
| Converting Numbers to Strings |
|
| Converting String to Numbers |
|
| String Manipulation Functions |
|
| Is This Variable Number or String? |
|
| JavaScript Coding Styles |
|
| Using the objGlobal Object |
|
| Getting Organized |
|
| Using objGlobal to pass optional parameters |
|
| Using objGlobal to define commonly used functions |
|
| Using |
|
| Interacting with Instance Lists in Scripts |
|
| The List Manager |
|
| Visual and Programmatic Identifiers |
|
| Working with All Selected Entries |
|
| Scripting Pop-up Menu |
|
| Replacing Hardcoded User Name with Current Framework User |
|
| Replacing Hardcoded Employee Number with Current Instance List Entry |
|
| Adding Your Own Options to the Scripting Pop-Up Menu |
|
| Updating the Instance List from RAMP screens |
|
| Filter Code which Automatically Handles Changes to Instance List |
|
| Subfiles/Browselists |
|
| Subfile Lines per Entry |
|
| Identifying Subfile fields |
|
| Referencing Subfile fields |
|
| Iterating Subfile Rows |
|
| Paging down or up a subfile |
|
| Locating a specific value in a Subfile and making the selection |
|
| Script Skeletons |
|
| Script Functions |
|
| GET_MENU_OPTION_NUMBER Function |
|
| LOCK_FRAMEWORK Function |
|
| UNLOCK_FRAMEWORK Function |
|
| RESTART_LAST_NAVIGATION Function |
|
| OVRSFLAUTOGUI Function |
|
| AVSWITCH Function |
|
| TRIM_RIGHT Function |
|
| TRIM_LEFT Function |
|
| SHOW_CURRENT_FORM Function |
|
| SHOWSTATUSBAR Function |
|
| TOSTRING Function |
|
| TONUMBER Function |
|
| SETBUSY Function |
|
| CHECK_FIELD_EXISTS Function |
|
| DROP_SPECIAL_FIELD_HANDLER Function |
|
| SET_SPECIAL_FIELD_HANDLER Function |
|
| GET_FORM_MESSAGE Function |
|
| SCREEN Function |
|
| HIDE_5250_BUTTONS() Function |
|
| SHOW_5250_BUTTONS() Function |
|
| COPYTOCLIPBOARD Function |
|
| FATAL_MESSAGE_TYPE Function |
|
| SETKEYENABLED Function |
|
| SETVALUE Function |
|
| Q_SETVALUE Function |
|
| GETVALUE Function |
|
| SENDKEY Function |
|
| Q_SENDKEY Function |
|
| CHECK_CURRENT_FORM Function |
|
| Q_CHECK_CURRENT_FORM Function |
|
| AVCLOSEFORM Function |
|
| HIDE_CURRENT_FORM Function |
|
| CURRENT_FORM Function |
|
| SETCURSORTOROW Function |
|
| SETCURSORTOFIELD Function |
|
| ALERT_MESSAGE Function |
|
| CLEAR_MESSAGES Function |
|
| FATAL_MESSAGE Function |
|
| MESSAGE Function |
|
| AVSIGNALEVENT Function |
|
| TRACE Function |
|
| HANDLE_PROMPT Function |
|
| NAVIGATE_TO_SCREEN Function |
|
| Q_NAVIGATE_TO_SCREEN Function |
|
| STRIP_LEADING_NUMBERS Function |
|
| ADD_STRING Function |
|
| STRING Function |
|
| OVERRIDE_KEY_CAPTION_SCREEN Function |
|
| OVERRIDE_KEY_CAPTION_ALL Function |
|
| AVSAVEVALUE Function |
|
| AVRESTOREAVALUE and AVRESTORENVALUE Function |
|
| AVRESTOREAVALUE and AVRESTORENVALUE in VLF-ONE |
|
| ADD_UNKNOWN_FORM_GUESS Function |
|
| SET_HANDLER_CAPTION Function |
|
| Framework Objects that Scripts Can Refer To |
|
| objGlobal |
|
| objFramework |
|
| objApplication |
|
| objBusinessObject |
|
| objCommand |
|
| objListManager |
|
| objUser |
|
| Function Key Names for SENDKEY Function |
|
| User-Defined Script Functions |
|
| Switching Off Recursion Checking |
|
| When Are Scripts Reloaded so That Change Can Be Tested? |
|
| Advanced Scripting |
|
| Creating your own navigation planner |
|
| Using Screen References |
|
| Using a vHandle_DEPART function |
|
| Arrival Scripting and Inter-Screen Communication |
|
| Debugging |
|
| Debug and Diagnostics |
|
| Common Scripting Errors |
|
| Unable to display form |
|
| Could not complete the operation due to error 80020101 |
|
| Object expected |
|
| Strange behavior in scripts |
|
| Your script does not execute at all |
|
| Tracing |
|
| Using ALERT_MESSAGE in Your Scripts |
|
| Screen Enrichment |
|
| Hide screen titles in individual RAMP Screens |
|
| Two Ways to Hide the Title |
|
| The HTMLAPI Scripting Object |
|
| Using The HTMLAPI Scripting Object |
|
| HTMLAPI Usage Examples |
|
| Implementing a Basic Standard Layout function |
|
| Generically Modifying a Screen via the Standard Layout function |
|
| Specifically Modifying a Screen via a Specific Layout function |
|
| Adding More Capability to the Standard Generic Handler |
|
| Modifying Subfile Headings |
|
| Modifying Fonts |
|
| Adding Images |
|
| Things to watch out for |
|
| What HTMLAPI functions are provided? |
|
| VLF-ONE 5250 Form Wrappers |
|
| Why Would You Create a Form Wrapper? |
|
| How Do You Create a Form Wrapper? |
|
| How Do You Cause a Wrapper to Be Displayed? |
|
| What Is the Basic Anatomy of a Wrapper? |
|
| 5250 Attribute Bytes |
|
| How Do Wrappers Send Function Keys to the 5250 Form? |
|
| Can a Wrapper Service More Than One 5250 Form? |
|
| Can a 5250 Form Have More Than One Wrapper? |
|
| Things You Should Approach Cautiously When Using Wrappers |
|
| Things You Should Do When Using Wrappers |
|
| When a Wrapper Wants to Request a RAMP Script to Do Something |
|
| When a RAMP Script Wants to Request a Visual LANSA Wrapper to Do Something |
|
| Positioning Wrappers |
|
| Advanced Wrappers |
|
| Using DF_WRAPO to Understand, Experiment or Trace |
|
| VLF-WIN Screen Wrappers |
|
| When to Use 5250 Screen Wrappers? |
|
| Screen Wrapper Fundamentals |
|
| Events |
|
| RampMessage Event |
|
| RampTSAvailable Event |
|
| vHandleArrive Event |
|
| Methods |
|
| MakerampTSavailable Method |
|
| NavigateToScreen Method |
|
| SetValue Method |
|
| GetValue Method |
|
| SendKey Method |
|
| Current_Form Method |
|
| SetCursor Method |
|
| SetCursorToField Method |
|
| Get_Form_Message Method |
|
| Check_Field_Exists Method |
|
| Examples |
|
| Example 1: Show Employee Details |
|
| Example 2: Show Employee Details and Skills |
|
| Example 3: Show the IBM i Disk Usage |
|
| Transitioning to RAMP in VLF-ONE |
|
| The Major Differences |
|
| Comparing VLF-WIN and VLF-ONE Code |
|
| Some Techniques for Handling the Differences |
|
| The Minor Differences |
|
| Location of the Files Used by RAMP at Run Time |
|
| Programming Techniques |
|
| Using Function Key Descriptions to Condition RAMP Buttons |
|
| Questions about the Function |
|
| SHARED.apply5250FunctionKeyPatterns |
|
| Handling a Single Screen which Shows Multiple Modes |
|
| A Command Handler Tab with Many 5250 Destinations |
|
| A User Controlled Command Tab with Many Destinations |
|
| A Program Controlled Command Tab with Many Destinations |
|
| Using this Approach in other Situations |
|
| Advanced Prompting |
|
| Using Prompter Forms |
|
| Are any Examples Provided to Learn More about this Topic? |
|
| A RAMP Design Approach – Using a Single Junction Point (SJP) |
|
| How does an SJP work? |
|
| Is an SJP really that simple in a real application? |
|
| Can SJP do the other useful things? |
|
| Does SJP have to be CL (Control Language) program? |
|
| What other issues might impact the use on an SJP approach? |
|
| Using HIDE_CURRENT_FORM to manage access to command handler tabs |
|
| Multilingual RAMP Applications |
|
| Troubleshooting |
|
| xxxxxxx is an orphan script and should be deleted |
|
| Screen does not react when selection is changed in instance list |
|
| Error running RAMP in end-user mode (UF_EXEC) but not in design mode (UF_DESGN) |
|
| Performance Issues |
|
| Frequently Asked Questions |
|
| How to tell in a RAMP-TS script what theme is being used? |
|
| How is a Framework associated with RAMP-TS or RAMP-NL? |
|
| I have made a mistake in classifying a screen. How do I change the classification? |
|
| How do I differentiate two screens which have the same name? |
|
| How can I use web browser windows from RAMP scripts? |
|
| How can I get the message from the bottom of the current 5250 screen into my RAMP script? |
|
| How do I handle RA (Auto Record Advance) fields? |
|
| Why should the F12=Cancel and F3=Exit buttons and function keys be disabled on every 5250 screen? |
|
| Do I have to identify and script every 5250 screen in my application to modernize it? |
|
| How can I get the RAMP tool to assign a fixed session? |
|
| How do I make my scripts work in multiple partitions? |
|
| Can you add in your own functions to the scripts? |
|
| How do I stop break messages in aXes 5250 sessions? |
|
| Where and how are my RAMP-TS screen identifications kept? |
|